Introduction
Purpose
The purpose of this guide is to share how I have configured Jupyter Hub and Jupiter Labs to on my Synology NAS primarily in support of my home automation and related OpenAI projects.
Context
The Jupyter project and its subprojects all center around providing tools (and standards) for interactive computing with computational notebooks. Jupyter is and open-source umbrella project that covers many different software offerings and tools, including the popular Jupyter Notebook, the JupyterLab web-based user interface, and JupyterHub which is a multi-user Hub that spawns, manages, and proxies multiple instances of the single-user Jupyter notebook server.

These tools make it easier to align iterative code development and documentation throughout the planning, design, test, and implementation stages of home automation projects. I’ve chosen to run Jupyter applications as Docker containers as it allows one of the easiest ways to spin up new services and run solutions on Synology while isolating the potential impacts on application dependencies like web services and python.
Prerequisites
- Synology DSM (Version 7.2)
- Container Manager (Docker) installed
- Portainer (optional but useful)
Useful References
- Project Jupyter Documentation
- JupyterHub Github
- JupyterLab Github
Step 1. Prepare Synology NAS
a. Create application user and group
Create a Synology user and group to assign permissions and provide application access to storage.
- Create a group named jovyan
- Create a user named jovyan
- Add the jovyan user to groups
- jovyan
- administrator
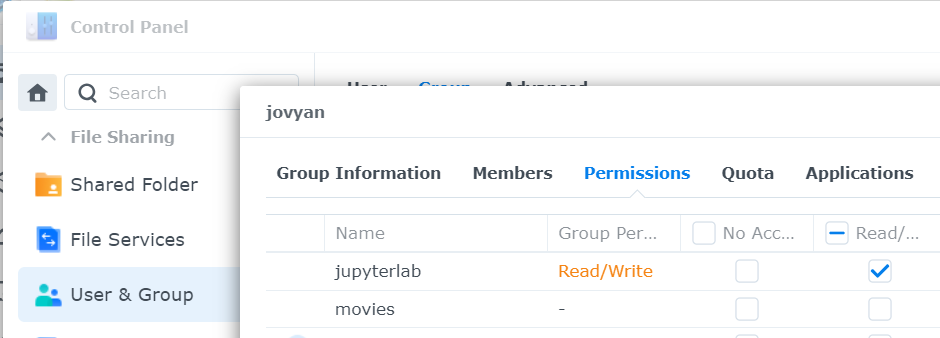
- On the Permissions tab, select Local groups from the dropdown and assign Read/Write permissions for the jovyan group you just created. Deny all applications permission except DSM
Synology DSM => Control Panel => User & Group
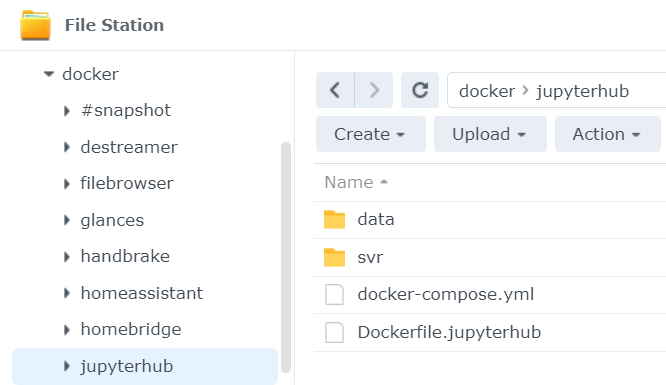
b. Create Container Configuration Folders
These folders will be mounted to docker containers and allow easy access to configuration files via the DSM UI. Files here are persisted if docker containers are restarted or deleted, and can easily be backed up using DSM backup tools.
Create Synology folders to store jupyterhub configuration files and data.
- /volume2/docker/jupyterhub
- /volume2/docker/jupyterhub/svr
- /volume2/docker/jupyterhub/data
Tip! Use only lowercase letters.
Synology DSM => File Station => Create
c. Create Jupyter Notebooks Storage
These folders will store jupyter notebooks and must match mount sites in the jupyterhub_config.py file below.
- /volume1/jupyterlab/{username}
- /volume1/jupyterlab/shared
- /volume1/jupyterlab/openai
- /volume1/jupyterlab/homeassistant
Note! Replace {username} with the name of the user that will register in jupyterhub. There is a way to bootstrap automatically creating this directory when a new person registers, but I haven’t figured that out yet.
Synology DSM => Control Panel => Shared Folder

d. Create configuration files
Upload or create the following default configuration files used to create the required docker images.
jupyterhub/Dockerfile.jupyterhub
## filename: Dockerfile.jupyterhub
# Copyright (c) Jupyter Development Team.
# Distributed under the terms of the Modified BSD License.
ARG JUPYTERHUB_VERSION
FROM jupyterhub/jupyterhub:$JUPYTERHUB_VERSION
# Install dockerspawner, nativeauthenticator
# hadolint ignore=DL3013
RUN python3 -m pip install --no-cache-dir \
dockerspawner \
jupyterhub-nativeauthenticator
CMD ["jupyterhub", "-f", "/srv/jupyterhub/jupyterhub_config.py"]jupyterhub/docker-compose.yml
## filename: jupyterhub/docker-compose.yml
# Copyright (c) Jupyter Development Team.
# Distributed under the terms of the Modified BSD License.
# JupyterHub docker-compose configuration file
version: "3"
services:
hub:
build:
context: .
dockerfile: Dockerfile.jupyterhub
args:
JUPYTERHUB_VERSION: latest
restart: always
image: jupyterhub
container_name: jupyterhub
networks:
- jupyterhub-network
volumes:
# The JupyterHub configuration file
- "/volume2/docker/jupyterhub/svr/jupyterhub_config.py:/srv/jupyterhub/jupyterhub_config.py:ro"
# Bind Docker socket on the host so we can connect to the daemon from within the container
- "/var/run/docker.sock:/var/run/docker.sock:rw"
# Bind Docker volume on host for JupyterHub database and cookie secrets
- "/volume2/docker/jupyterhub/data:/data"
- "/volume2/docker/jupyterhub/svr:/svr"
ports:
- "8010:8000" #My port 8000 was used by portainer, so changed to 8010
environment:
# This username will be a JupyterHub admin
JUPYTERHUB_ADMIN: admin
# All containers will join this network
DOCKER_NETWORK_NAME: jupyterhub-network
# JupyterHub will spawn this Notebook image for users
#DOCKER_NOTEBOOK_IMAGE: jupyter/datascience-notebook:latest
DOCKER_NOTEBOOK_IMAGE: jupyter/base-notebook:latest
# Notebook directory inside user image
DOCKER_NOTEBOOK_DIR: /home/jovyan/work
# Using this run command
DOCKER_SPAWN_CMD: start-singleuser.sh
volumes:
data:
networks:
jupyterhub-network:
name: jupyterhub-network
jupyterhub/srv/jupyterhub_config.py
## filename: jupyterhub/docker-compose.yml
# Copyright (c) Jupyter Development Team.
# Distributed under the terms of the Modified BSD License.
# Configuration file for JupyterHub
import os
c = get_config() # noqa: F821
# We rely on environment variables to configure JupyterHub so that we
# avoid having to rebuild the JupyterHub container every time we change a
# configuration parameter.
# Spawn single-user servers as Docker containers
c.JupyterHub.spawner_class = "dockerspawner.DockerSpawner"
# Spawn containers from this image
c.DockerSpawner.image = os.environ["DOCKER_NOTEBOOK_IMAGE"]
# JupyterHub requires a single-user instance of the Notebook server, so we
# default to using the `start-singleuser.sh` script included in the
# jupyter/docker-stacks *-notebook images as the Docker run command when
# spawning containers. Optionally, you can override the Docker run command
# using the DOCKER_SPAWN_CMD environment variable.
spawn_cmd = os.environ.get("DOCKER_SPAWN_CMD", "start-singleuser.sh")
c.DockerSpawner.cmd = spawn_cmd
# Connect containers to this Docker network
network_name = os.environ["DOCKER_NETWORK_NAME"]
c.DockerSpawner.use_internal_ip = True
c.DockerSpawner.network_name = network_name
# Explicitly set notebook directory because we'll be mounting a volume to it.
# Most `jupyter/docker-stacks` *-notebook images run the Notebook server as
# user `jovyan`, and set the notebook directory to `/home/jovyan/work`.
# We follow the same convention.
notebook_dir = os.environ.get("DOCKER_NOTEBOOK_DIR", "/home/jovyan/work")
c.DockerSpawner.notebook_dir = notebook_dir
#Mount folders must be created in advance on in the Synology jupyterlab share
# until I can figure out how to get a bootstrap mkdir to work.
# Mount the real user's Docker volume on the host to the notebook user's
# notebook directory in the container
#c.DockerSpawner.volumes = {"jupyterhub-user-{username}": notebook_dir}
#update to mount to Synology Shared Folder.
# c.DockerSpawner.volumes = {"/volume1/jupyterlab/{username}": notebook_dir}
c.DockerSpawner.volumes = {
'/volume1/jupyterlab/{username}': notebook_dir,
'/volume1/jupyterlab/shared': '/home/jovyan/work/shared',
'/volume1/jupyterlab/openai': '/home/jovyan/openai',
'/volume1/jupyterlab/homeassistant': '/home/jovyan/homeassistant'
}
c.DockerSpawner.environment = {
'OPENAI_API_KEY' : 'sk-ENTER YOUR OPENAPI KEY HERE'
}
c.DockerSpawner.environment = {
'OPENAI_API_KEY' : 'sk-ENTER YOUR OPENAPI KEY HERE',
'HUGGINGFACEHUB_API_TOKEN' : 'hf_ENTER YOUR HUGGINGFACE KEY HERE'
}
# Remove containers once they are stopped
c.DockerSpawner.remove = True
# For debugging arguments passed to spawned containers
c.DockerSpawner.debug = True
# User containers will access hub by container name on the Docker network
c.JupyterHub.hub_ip = "jupyterhub"
c.JupyterHub.hub_port = 8080
# Persist hub data on volume mounted inside container
c.JupyterHub.cookie_secret_file = "/data/jupyterhub_cookie_secret"
c.JupyterHub.db_url = "sqlite:////data/jupyterhub.sqlite"
# Authenticate users with Native Authenticator
c.JupyterHub.authenticator_class = "nativeauthenticator.NativeAuthenticator"
# Allow anyone to sign-up without approval
c.NativeAuthenticator.open_signup = True
# Allowed admins
admin = os.environ.get("JUPYTERHUB_ADMIN")
if admin:
c.Authenticator.admin_users = [admin]
Step 2. Install JupyterHub and Start Jupyter Containers
Login to Synology NAS via SSH as root after initial login and password entry.
sudo -i
password:
cd /volume2/docker/jupyterhub
docker-compose up -dThese commands build the docker image and run the jupyterhub container, which also spawns the jupyterlab instance for new users when they register in the jupyterhub.
Validate jupyterhub is working
- http://<localhost>:8010 (this port must match the host port specified in jupyterhub/docker-compose.yml. You may need to replace <localhost> with the local IP address of your Synology NAS.
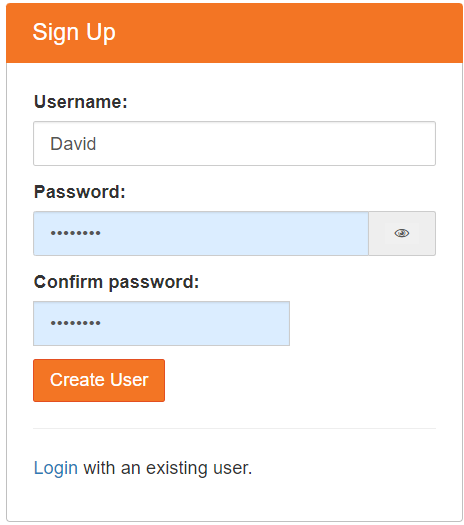
- First login: select “Sign up” from the login screen and enter your credentials.
- Use the credentials you just created to login.
Notes:
Your signup name must match the name of the folder you created in step 1c above so that your mount will be successful and will store your notebooks.
New browser
If all is working, the jupyterhub will spawn a base-notebook jupyterlab signal instance for you. You can change the default notebook in the DOCKER_NOTEBOOK_IMAGE environment variable of the docker-compose.yml file. Now let’s make the connection secure and remotely accessible.
For openai modules to work, docker containers must install the following modules. Openai starter notebooks will fail unless these modules and your personal API key environment variable is set. Having this done automatically is on my to-do list.
docker exec -it jupyter-<your username> bash
pip install openai
pip install tiktoken
pip install python-dotenv
pip install jupyter_ai
pip install huggingface_hub
pip install Pillow
pip install ipywidgets
#or
pip install openai tiktoken python-dotenv jupyter_ai huggingface_hub Pillow ipywidgets
#For local Llama include
pip install langchain sentence_transformers faiss-cpu ctransformersNow create your own custom docker image as follows:
docker exec -it jupyter-<your username> bash
exit
#commit changes to image
docker commit jupyter-david
#determine the image ID
docker images
#tag the image with the name of your choosing.
#Put this name in your docker-compose and rebuild
docker tag <image id> jupyter/base_openai
#or
docker tag <image id> jupyter/base_llama
Step 3. Enable SSL via Reverse Proxy
Synology reverse proxy is a great way to enable access to all applications hosted on the NAS devices in your local area network and use the same SSL certificate used by the Synology NAS to achieve SSL for the applications as well. I find this to be far easier than managing certificates for each application.
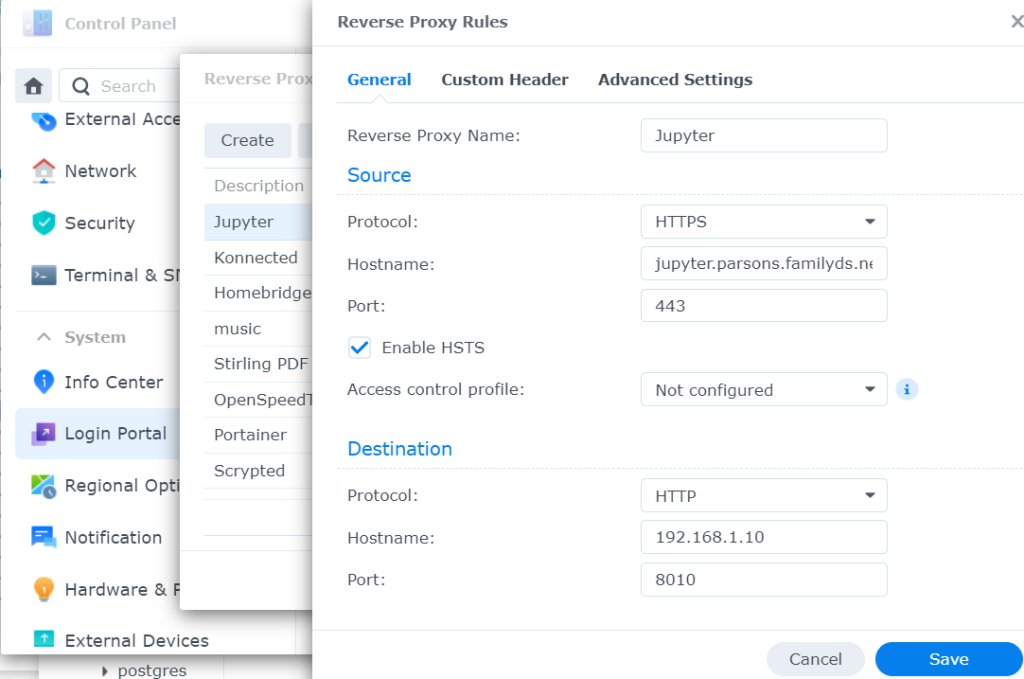
Create a new reverse proxy
- Reverse Proxy Name: Jupyter
- Hostname: jupyter.<your.domain.com>
- Source Protocol / Port: HTTPS / 443
- Enable HSTS (force SSL)
- Destination Protocol / Port: HTTP / 8010 (this must match the host port specified in jupyterhub/docker-compose.yml)
Note! Requires valid wildcard certificates setup on Synology NAS.
Synology DSM => Control Panel =>Login Portal => Reverse Proxy => Create
Step 4. Explore and enjoy Jupyter!
Next Steps
Explore related posts:
If you found this post useful, please donate to help this site create more useful content.